DIY Pergola Fire Pit Ideas That Are So Easy, You’ll Want to Start Right Now!
This post grew from a simple craving: to keep evenings warm and inviting under the pergola without a big, hard project. The space already looks great, but cool nights push me to add heat and light. I wanted to share ideas that are easy to pull off with basic tools and quick finishes. So here are DIY pergola fire pit ideas that you can start this weekend.
If you love evenings outside, and you care about small projects that actually work, this is for you. If your pergola feels a bit chilly after sunset or your gatherings end early, you’ll find ideas that fit your space. You don’t need fancy gear to create warmth and a focal point that looks great.
I pulled together a range of options using common materials like bricks, pavers, steel bowls, and repurposed cans. Each idea includes plain steps you can follow, with safety tips and rough costs. Here’s what you’ll get: practical, ready-to-build ideas, clear steps, and tips to stay safe. You’ll see styles from rustic to modern and everything in between.
These projects save money and time while delivering real warmth. They help you extend patio time, make meals feel more social, and give guests a place to gather. You can mix the crackle of wood, soft lantern light, and the glow of hot metal for a cozy vibe. Think about your pergola height, clearance, and the space around the pit to choose a safe setup.
Curious about fuel options, weather habits, and safety basics? I cover wood fires, gas or ethanol options, and simple rain covers. I also share quick checks to keep things clean and secure year round. The plan is to give you practical steps and real world tips you can apply today.
Stay with me to see idea #20, a crowd favorite you can tackle in a weekend. It fits small decks and big patios alike and uses materials you might already have. If you want a warm spot for chats, meals, or late night s’mores, you’ll find a path here. This post is a friendly guide you can reuse as the seasons change.
1. Classic Wooden Pergola

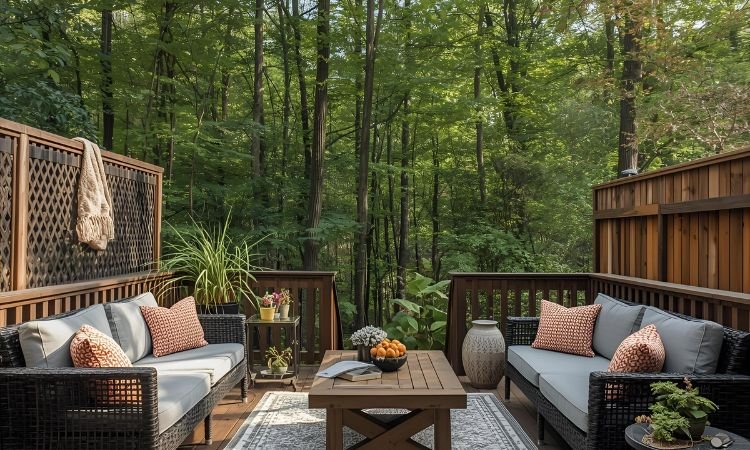
You want a warm spot by the fire that is easy to build. A classic wooden pergola fits that need. It uses simple, store-bought lumber. The frame is tall enough for comfortable seating below. You can keep the sky open or hang light fabric for a softer look. Climbing plants, like wisteria or grapevines, add shade and a touch of scent.
Materials Needed
– 4 wooden posts
– crossbeams
– wood screws
– weatherproof paint or stain
– concrete for anchoring
Build plan
Start with a simple rectangular frame. Position it where you want your fire circle. Set posts in concrete so they don’t move. Attach the crossbeams to hold the top. Add weatherproof paint or stain to protect the wood. If you want shade, run fabric between the posts or let vines climb the frame. Keep the design open so you still feel the outdoors.
Tips
– Use treated wood to resist weather damage.
– Anchor the posts firmly in concrete for wind stability.
– Choose a finish that wears well in your climate.
Your DIY pergola fire spot becomes the center of outdoor nights. Gather friends and family, hear the crackle, smell the wood, and enjoy simple warmth right at home.
2. Modern Metal Framework

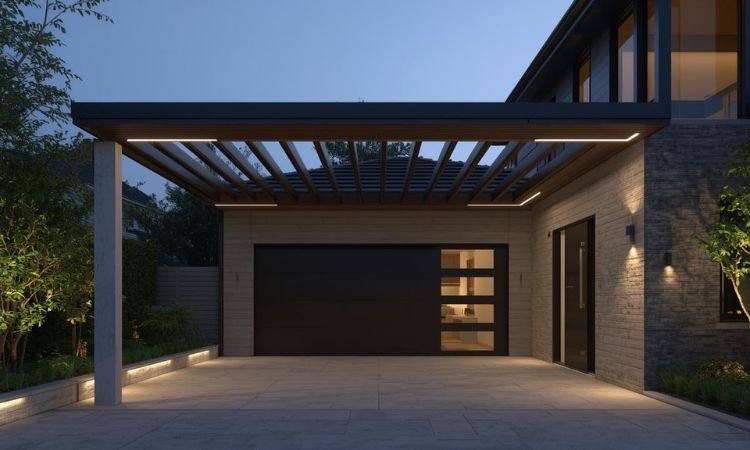
If you want a pergola that feels clean and sturdy, choose a modern metal frame. It shows straight lines and a simple look. The finish holds up in sun, rain, and wind. You can tailor the size and shape to fit your yard. In a city yard, metal adds an urban edge. A built in fire pit with a grill insert adds real function.
Materials You’ll Need
– Metal beams and posts form the frame.
– A fire pit insert and a compatible grill grate provide heat and cooking space.
– Basic welding gear or ready-made connectors join pieces safely.
Tips for Longevity
– Use weather resistant finishes in matte black or brushed steel.
– Pick seals and gaskets for joints to stop leaks.
Smart Add-Ons
– Pair with metal seating and frames that match the look.
– Add a low, heat safe rug and cushions for comfort.
The metal frame with the warm glow of fire makes outdoor gatherings feel dressy.
Next Steps
– Plan size by measuring the area and sketching a layout.
– Build the frame with solid supports.
– Install the fire pit insert and grill, then test heat and safety.
– Apply a weather seal and protective coat after curing.
3. Rustic Pallet Pergola

You want a cozy, budget friendly pergola that fits around a fire pit. A Rustic Pallet Pergola can do it. It uses reclaimed pallets and adds a warm, unique feel to your yard.
Materials
– Reclaimed pallets that fit your space
– Outdoor wood screws
– Fairy lights or string lights
– Sandpaper, outdoor stain or paint, and a sealant
– Optional outdoor cushions for seating
Build plan
– Choose a size that matches your pit and seating area
– Cut pallets to fit the frame you plan
– Build a simple frame with posts and crossbeams
– Attach the pallets to the frame to form walls or a shaded roof
– Drive in screws for sturdy joints
– String the lights between the beams for a soft night glow
– Leave space for air flow around the fire pit
Care and finishing
– Sand the pallets thoroughly to remove splinters
– Apply outdoor stain or paint for color and protection
– Let the finish dry, then seal for weather resistance
A pallet pergola with a fire pit creates a warm, welcoming gathering spot.
4. Pergola with Retractable Canopy

You want a fire pit area that works in sun and shade. A pergola with a retractable canopy gives you that control. Open it for bright evenings, close it for a cozier mood.
Here is why this setup fits many yards. It shields you from the strong sun and keeps light rain from spoiling a sit by the fire. At night, a closed canopy makes the glow feel more intimate. The system is simple to use, and it adapts to how you feel that day.
– Materials
– Pergola kit or sturdy framework
– Retractable canopy system
– Securing ropes or anchors
– Mounting hardware and simple pulleys
– Tip
– Pick a canopy fabric that is weather-resistant and easy to clean.
– Trick
– Add side curtains for privacy and extra shelter from wind or rain.
To set it up, start with solid measurements. Next, choose a canopy kit that fits your pergola width and depth. Mount the tracks or roller on the top beams. Hang the canopy and secure it along the sides. Test the pull and make sure it moves smoothly. If wind pops up, use simple braces or ties to hold the canopy in place.
This design gives you a reliable fire pit spot through sun and shower. It’s practical, affordable, and easy to adjust. Next steps—check your yard’s typical weather, price out kits, and plan seating so everyone fits comfortably.
5. DIY Stone Pergola

Want a sturdy, rustic look that lasts in your yard? A stone pergola fits. It stands strong through weather and seasons. It frames your fire area and invites people to gather around the glow.
– Materials Needed: Stone blocks, mortar, wooden beams for the roof.
– Smart Tip: Choose local stone so the pergola blends with the landscape.
– Space-Saving Trick: Build a built-in bench around the edge. It saves space and gives comfy seating.
Here is why it works. Stone provides durability and a timeless vibe. The wooden roof beams soften the look and let you feel the breeze. The solid walls act like a natural backdrop for the fire pit, keeping sparks away and the area cozy.
Next steps are simple. Start with a stable base and keep your stones level. Lock blocks with mortar, then notch and cap the structure with the wooden roof. Leave gaps for airflow and light. A built-in bench finishes the space and creates instant seating for conversations and sips by the flame.
If you want a long-lasting, all-season gathering spot, a stone pergola is a smart move. It blends natural charm with practical space for loungers, coffee, and late-night chats by the fire.
6. Pergola with Built-in Seating

You want a warm, easygoing fire spot under a pergola. A pergola with built-in seating makes that stop simple. It saves space and keeps everyone close to the glow.
Here is why this setup shines. The bench surrounds the fire pit, so every seat faces the flames. Cushions stay in place, and chat stays steady even when the wind picks up.
– Wrap-around bench design that threads the seating around the pit for a natural circle.
– Under-seat storage for blankets, throws, and games when the fire warms up.
– Weather-ready cushions with outdoor fabric and foam that dries fast.
– Smart material choice like cedar or treated pine that stands up to sun and rain.
Customize the look with a light stain to show grain, or a dark stain to hide dirt.
Next steps. Plan the footprint first. Measure the pit and the pergola width. Decide how high the bench should be for comfy seating. Sketch a curved or straight line that fits your space. Build with sturdy screws and corner blocks. Finish with a rain-friendly seal so you can use the space year-round.
– Materials: Wood for bench seating, cushions, outdoor fabric.
– Tip: Use weather-resistant foam for cushions.
– Trick: Add storage beneath seating for blankets.
Your backyard gains a cozy scene.
7. Pergola with Vertical Garden

Want more life around your fire pit under the pergola? A vertical garden adds color, privacy, and a cozy feel you can see and feel.
– Materials Needed: vertical garden planters, climbing plant varieties, sturdy hooks for hanging, twine or zip ties, a drip hose or watering can.
– Plant picks: choose vines that fit your sun and shade, like ivy, clematis, or jasmine. Add small herbs or flowers in the planters for scent and color.
– Placement: hang planters from rafters at different heights so vines cascade down.
What to plant and where to put it
– Choosing plants: pick species that handle your climate and light. If you have full sun, go for bold flowering vines. If you get more shade, pick green foliage and shade-loving climbers.
– Fragrance and color: mix herbs with blossoms. A few rosemary or thyme plants near the edge give a fresh scent as you sit by the fire.
– Maintenance: prune regularly. Keep a watering plan so roots stay moist without overwatering.
How to install and enjoy
– Install sturdy hooks and secure fasteners. Space planters evenly to avoid crowding.
– Let vines climb and spread. They create a living wall that softens the pergola and adds privacy.
– Use a simple drip line or hand-water early in the day. This keeps leaves dry at night.
Next steps: set up, water wisely, and enjoy a greener, cozier seating area by your fire pit.
8. Cozy Hangout with Floor Cushions

You want a cozy, easy hangout under your pergola. A warm fire pit nearby helps. Floor cushions make this setup quick and soft. You get casual seating that invites people to stay a while.
Materials You’ll Need
– Choose floor cushions in different sizes for comfort.
– Use outdoor throw blankets for warmth and texture.
– Pick cushions with waterproof covers or fabrics that are easy to clean.
– Add a small outdoor rug or mat to keep cushions in place.
Setup in a Few Simple Steps
1) Pick cushions in several colors to get a friendly, boho vibe.
2) Place them in a circle around the fire pit so everyone can chat.
3) Drape blankets nearby for warmth when the night cools.
4) Add a light outdoor rug or mat to stop cushions from sliding on slick decking.
5) Keep a small tray for drinks or snacks so people sit longer.
Care and Safety Tips
Keep cushions clean by washing covers regularly. Store them indoors or under cover when rain is coming. Check the area for sparks and keep a safe distance from the fire pit.
Why it Works
This setup invites everyone to share space. It adds comfort with little work and keeps conversations lively.
9. Pergola with Strung Lights

Here is why you should add strung lights to your pergola. They give warm, steady glow as the sun drops. Your fire pit nights feel inviting and calm. You can pick fairy lights for a soft sparkle or brighter bulbs for a bolder mood. You can mix both to balance charm and energy.
– Materials Needed: Strung lights, outdoor hooks or clips, weatherproof power source.
– Placement tips: Clip lights along the top beams. Let strands loop down each post. Use clips so cords stay neat and safe.
– Safety tips: Choose lights rated for outdoors. Use a GFCI outlet if you can. Keep connections off wet ground and away from splash zones.
– Mood controls: Add a dimmer to adjust brightness for conversations or late-night chats.
Next steps to get started.
– Step 1: Measure the distance between beams to know how many strands you need.
– Step 2: Pick an outdoor-rated string set for durability.
– Step 3: Attach hooks at even points.
– Step 4: Hang the lights, plug in, and test.
With this setup, your pergola becomes a welcoming night spot by the fire pit. It’s quick to install and easy to tailor to your space. It works with many pergola styles and any deck or yard. You can add a second strand for a fuller canopy.
10. Combo Fire Pit Table and Pergola

You want a dining spot that stays warm and social under your pergola. A combo fire pit table does that in one clever unit. It blends heat, light, and a place to eat into a single cozy space. With the right setup, meals feel special, and casual lunches become little outdoor events.
– Materials You’ll Need: Fire pit table and weatherproof dining chairs.
– Safety Tip: Make sure the fire pit is safe for cooking if you plan to use it for meals.
– Smart Trick: Add an umbrella for daytime protection.
This setup keeps your backyard stylish and practical all year. You can host dinners, chat with friends, and enjoy the warm glow as you eat. Just check local rules and follow safety guidelines for outdoor flames. If the flames crackle softly, you will feel the heat on your face and smell wood smoke mixing with fresh air. Think about where you want to place seating under the pergola for easy talking and space to move. When you finish setup, you will want to use it every week.
11. Pergola with an Outdoor Bar

Turn your pergola into a social hub with an outdoor bar. It creates a natural place to pour drinks, share stories, and set out snacks. You can build a simple bar with pallets or buy a ready-made unit.
– Materials Needed
– Outdoor bar unit or pallet bar
– Bar stools
– Shelving for bottles and glassware
– Cooler or mini fridge
– Small tray or drip pan
– Layout and Style
– Place the bar along the edge of the pergola
– Keep a clear path for traffic and seating
– Choose a look that matches your space: rustic wood, clean metal, or light coastal finish
– Weather and Durability
– Pick weather resistant materials
– Seal wood joints and add a protective finish
– Add a cover for off season use
– Stocking Ideas
– Stock it with drinks, mixers, ice, and snacks
– Use shelves to group items by use
– Keep a towel handy
– Practical Tips
– Add soft lighting
– Include a power source for blenders or lighting
– Use low voltage or battery lights
– Trick
– Add a mini fridge for cold bottles and easy access
– Maintenance
– Wipe spills right away
– Clean shelves weekly
– Re-seal wood yearly
– Next Steps
– Decide on a spot and pick your style
– Gather tools or a kit and start building or buying
– You will have a go-to spot for friends
12. Fire Pit with a Mosaic Table

Want a fire pit that doubles as a piece of art? A mosaic table around the pit adds color and a personal touch. You can build it with friends for a fun DIY day. It gives your backyard a warm, inviting look.
– Materials Needed: a sturdy table base, outdoor tiles or glass pieces, heat-proof adhesive, outdoor grout, and a weatherproof sealer.
– Safety Tips: choose tiles and grout rated for outdoor use and heat. Make sure the table sits on a stable, level surface.
– Pattern Planning: lay out a simple design on the base before you glue. This keeps colors even and joints tidy.
– Build Steps:
1) Clean the table base and wipe away dust.
2) Glue the tiles or glass pieces in place and let them set.
3) Apply grout between the joints and wipe off the excess.
4) Seal the top after the grout cures.
– Finishing Touches: trim rough edges with tile nippers and seal all surfaces. If you want, add a weather-safe mat under the table to catch drips.
– Design Ideas: use warm earth tones for a cozy feel, or bright glass for a lively look. A touch of mirror tile can make the fire glow brighter.
– Care and Maintenance: reseal yearly and clean with a mild soap. Repair any loose pieces promptly to keep the table safe.
13. Built-in Fire Pit with Seating

If you want a built-in fire pit under your pergola, this design is for you. It saves space and keeps your area tidy with a clean, modern line.
Here is why this setup works. You and your guests sit around the pit, and flames stay visible while you stay sheltered from wind and rain.
– What you need:
– Fire pit insert designed for outdoor use.
– Seating made of concrete, stone, or weatherproof materials.
– Outdoor cushions or weatherproof pillows.
– Alternative materials can be brick, natural stone, or poured concrete.
– Safety tips:
– Provide proper ventilation and keep a safe gap from wood framing.
– Use a spark screen and keep a nonflammable surface under the pit.
– Keep a water bucket nearby for quick cooling.
– Design ideas:
– Create seat levels at different heights for easy conversation and comfort.
– Choose neutral tones or bold accents that match your pergola.
– Add padded cushions and a weatherproof throw for cooler nights.
– Next steps:
– Lay out measurements, then build the seating bench around the pit.
– Install the fire pit insert and seal edges.
– Test the setup with a short, supervised burn.
– Maintenance and care:
– Paint or seal the seating to resist weather.
– Clean the pit after use and check vents for debris.
– Keep cushions dry and rotate them so they wear evenly.
This layout blends form and function in a simple, practical way.
14. Pergola with a Swing

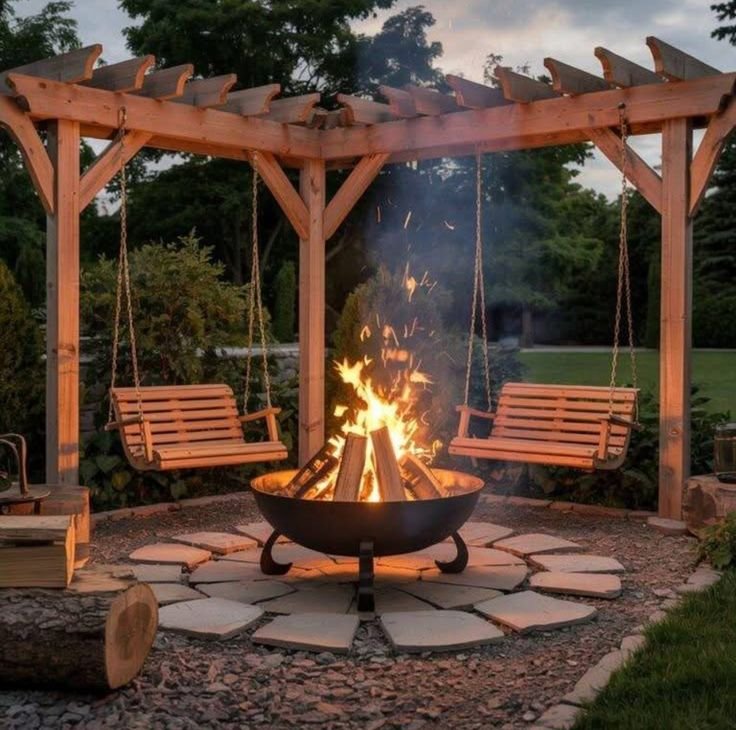
Is your fire pit area missing a soft touch? A pergola with a swing adds warmth and a comfy spot to linger by the flames.
Here is why it helps:
– It creates a cozy focal point that invites people to sit and chat.
– The gentle sway of a swing makes the scene feel calm and welcoming.
Materials you’ll need
– A swing seat sized for your space
– Sturdy hanging hardware rated for outdoor use
How to install
– Pick a strong beam in the pergola.
– Use two attachment points if you can.
– Choose corrosion-resistant bolts and brackets.
– Tighten all screws before you sit down.
Safety and care
– Tip: anchor the swing so it cannot swing toward the pit or a wall.
– Trick: choose weather-resistant cushions and rope or chain that won’t stretch in sun and rain.
Night time vibes:
– Add soft lights along the edge of the pergola.
– The swing glows softly while the fire crackles in the background.
If you have room for a double swing, two people can share a laugh and make the space feel lively as night falls.
Start with a single swing, then swap in a second seat if you want more company.
This update is easy to add, quick to enjoy, and simple to keep up year after year.
15. Pergola with a Canopy of Drapes

You want a space around your fire that feels warm and inviting. A pergola with draped fabric can give you that in minutes. It adds romance and cuts the evening chill, so conversations stay cozy.
– What you get A soft, elegant backdrop that moves with the breeze. It helps block wind on cooler nights too.
– Materials Needed Outdoor drapery fabric, a curtain rod or low-profile wire, sturdy hooks or clips, and simple tiebacks.
– How to install Measure the pergola span. Install the rod or string along the beams. Hang the drapes and secure the sides. Add tiebacks so you can open them when you want more air.
– Fabric choices Light fabrics look airy and flutter in the wind. Heavier fabrics feel warmer and add privacy. Choose outdoor-rated, fade-resistant material.
– Tips to keep it neat Add weighted hems and secure the top so they don’t flap. Use bright or dark tiebacks to switch the mood.
– Mood and color Colors change the vibe. White or ivory feels calm. Navy or moss green feels intimate. You can mix tones to vary the scene.
– Care and limits Check care labels. Clean with mild soap and water. Dry before rain. In very windy areas, use stronger hardware and shorter panels.
Next steps: measure, pick fabrics, and schedule a quick weekend setup. This simple canopy of drapes elevates your outdoor time without a big rebuild.
16. Pergola with Natural Stone Pathway

Here is why a stone pathway to your pergola is a smart upgrade. It guides guests, sets the pace, and makes your yard feel calm.
A stone path adds texture and color. Mix different sizes and textures for depth. Line the edges with low flowers or soft groundcovers to soften the look.
– Materials Needed: Natural stones in 1 to 2 sizes, sand or crushed gravel for the base, edging to keep the line tidy, soil and plants for borders.
– Layout Tip: Sketch the route first. Let it curve gently as you approach the pergola. Start wider near the yard and narrow at the entrance to draw the eye forward.
– Trick: Use at least three stone sizes. Combine smooth, rough, and split faces for visual interest.
Next steps: level the ground, lay a thin base, set the stones, and fill joints with sand or soil. Leave small gaps for moss or tiny pebbles if you like. Add mulch or plant edging to keep dirt from washing away.
A stone pathway is more than just functional. It gives your space a classic look and pairs well with many pergola styles. It’s easy to maintain and can evolve with seasonal plantings.
17. Fire Pit with a Grill Top

You want warm nights and good food without juggling gear. A fire pit with a grill top makes that easy. You cook beside the flames while you chat with friends.
Here is why this setup helps. A grill grate sits over the fire. Heat covers the food and the air around you. It keeps the gathering close and the meal simple.
– What you’ll need
– Fire pit with a built in grill top
– A sturdy grill grate that fits your pit
– Long tongs, a spatula, and a basting brush
– Heat resistant gloves and a small wire brush
– A spice rack or tray for quick seasonings
– How to set it up
– Place the grate at a safe height above the flames
– Light the fire and let the heat steady
– Grill small batches, flip often, and watch for flare ups
– Raise or lower the grate to tune the heat as you cook
– Tips to get great results
– Use good quality tools for the best bites
– Keep a spray bottle handy for minor flare ups
– Prep meats and veggies before you start
– Add a spice rack for fast flavor boosts
Next steps. Start with burgers, peppers, or kebabs and test your pit grill this weekend.
18. Pergola with a Water Feature

You want a calm, inviting spot by your pergola. A water feature nearby helps muffle noise and adds a relaxing rhythm to your nights by the fire.
Here is why it works. The soft splash and hum from moving water calm the mind and focus the eye on your space.
– Feature options:
– A compact fountain kit that sits on a pedestal or a small basin.
– A shallow pond with a few friendly fish and simple plants.
– A mini water garden with a bubbling rock or a tiny waterfall.
– Materials you’ll need:
– Fountain kit or pond liner, depending on your choice.
– A pump and tubing, plus a few aquatic plants.
– Safe edging to keep soil in place and curious paws away.
– Smart tips:
– Use a solar-powered pump for a greener setup.
– Place the feature where you can enjoy it from both the fire pit and the seating area.
Next steps: plan the layout, choose a power source, and run a test before you finalize the space.
Size and safety matter. In a tight yard, place a slim fountain near the pergola edge. In a bigger yard, a shallow pond fits well with the seating area. Plan a safe power source and keep cords away from water.
Maintenance is simple. Check the pump monthly. Wipe off leaves. Top off water when needed.
You can add a few colorful plants to finish the look. This setup turns your backyard into a quiet oasis. You get gentle water sounds, a pleasing view, and a scene you can enjoy all season.
19. Pergola with Seasonal Decor

Your fire pit area should feel fresh with just a few tweaks. Hang seasonal decor from the pergola to match the weather.
– Materials needed: Seasonal decor items, removable hooks or clips, and storage bins for off-season pieces.
– Setup steps:
1) Pick a season and a simple color idea that fits your cushions and wood.
2) Plan a small focal point above the fire pit so guests notice it first.
3) Use removable hooks or clips so you can switch items with little effort.
4) Store off-season pieces in labeled bins when the season is over.
– Seasonal ideas:
Autumn keeps things cozy with mini wreaths, faux leaves, and warm-toned accents.
Winter shines with string lights, metal lanterns, and pine sprays.
Spring welcomes bright florals, birds, and fresh greens.
Summer loves lightweight pieces like paper lanterns, solar lights, and small fans.
– Quick tips:
Choose items that weather well and won’t fade quickly.
Secure items so they won’t rattle in a breeze.
Swap 2 or 3 pieces at a time to keep the look balanced.
Label storage bins so you can find them fast next season.
Next steps: Decide which season you’ll start with, gather your pieces, and set them up this weekend. Take a photo to see how the space feels and plan your next swaps.
20. Unique Fire Pit Design

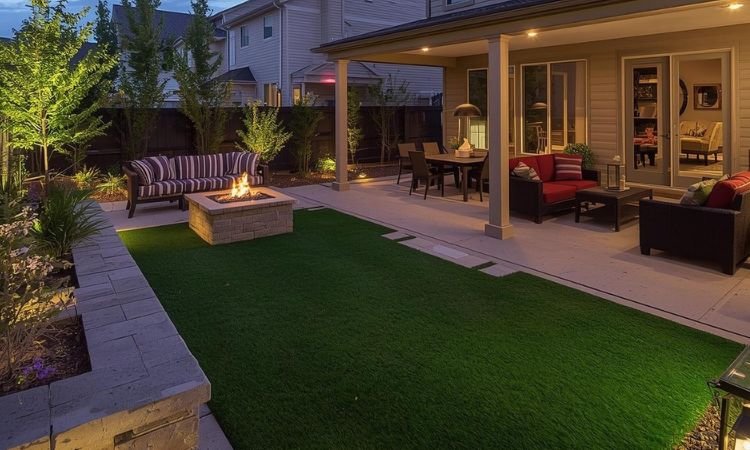
You want a fire pit under your pergola that feels like a feature, not a project. A unique shape can do that. Try a square, a long rectangle, or a custom form that fits your space. The shape itself becomes a focal point for your backyard and a warm glow on cool nights.
Here is why it helps. A one-of-a-kind outline guides how you sit and how you light. It invites people to gather and stay. The design also adds art to your outdoor room.
Materials
– Fire pit base designed for outdoor heat, such as a steel ring with a heat-proof liner.
– Stone, brick, or concrete blocks to frame the pit.
– Weatherproof tiles or pavers for a clean edge.
– Durable seating that follows the pit’s lines.
– Mortar, sealant, and a simple rain cover.
How to build
– Pick a shape that fits your pergola area and keeps a safe clear zone.
– Choose sturdy, weather-friendly materials.
– Plan airflow and safe fuel use.
– Add a low edge or screen to keep embers in.
– Arrange seating to mirror the pit’s form.
Tip: Use clean-burning fuels that are safe for outdoor use.
Next steps
– Sketch the layout on paper.
– Gather materials or buy a pre-made kit.
– Build with a helper, then test at dusk for best glow.
Conclusion
With all these DIY pergola fire pit ideas, your backyard can transform into a stunning outdoor retreat! Whether you opt for something classic or modern, each project offers a unique charm that will surely impress friends and family.
Get started on your own DIY adventure and create a space that brings warmth and joy. Happy building!